Journal of Statistics Education v.3, n.1 (1995)
Copyright (c) 1995 by Jon E. Anderson and J. David Dayton, all rights reserved. This text may be freely shared among individuals, but it may not be republished in any medium without express written consent from the authors and advance notification of the editor.
Key Words: Influence diagnostics; Dynamic graphics; Dynamic simulation.
XLISP-STAT is free statistical software available for a variety of computing platforms. This article presents XLISP-STAT programs and explanations for three kinds of educational modules relevant to an applied regression course: new mouse modes, regression surface displays, and dynamic simulations for the sampling distribution of an estimated regression coefficient. These modules can be incorporated into laboratory sessions or lectures to demonstrate topics like case diagnostics, visualizing multiple regression, and the impact of distributional assumptions on the sampling distribution of an estimated regression coefficient. The structure of the modules can be easily modified by instructors to include additional topics.
1 Regression analysis is one of the most widely used methods in statistics. Part of this popularity is due to the wide availability of computers and packages for performing such analyses. Computers and statistical software have become very good at providing results of complex analyses and many numerical summaries, but they have not yet reached their potential for instruction on regression methods. There are certainly many reasons for this, but the cost of appropriate software and the existence of many different computing platforms have complicated instructional progress. In this article we hope to contribute to this progress by presenting instructional modules written in the XLISP-STAT language.
2 XLISP-STAT is a software package developed by Luke Tierney at the University of Minnesota. The software is available for Macintosh, PC, and UNIX platforms. XLISP-STAT is appropriate for developing instructional software because it has excellent programming and graphics capabilities, is available for a variety of computers, and is "freeware." The software and documentation are available from Statlib or by anonymous ftp from umnstat.stat.umn.edu. The anonymous ftp site ftp.stat.ucla.edu not only contains the XLISP-STAT software and documentation, but also has user-written modules that can be found in directory /pub/lisp/xlisp/xlisp-stat/code/statistics.
3 Advanced XLISP-STAT programming techniques and further details are given in Tierney (1990). Cook and Weisberg (1994) present the R-code, a computer program written in the XLISP-STAT language. The R-code, short for regression code, provides a system for linear regression analysis that supplements and complements the regression tools already available in XLISP-STAT. In fact, the XLISP-STAT software is needed to use the R-code. Because the XLISP-STAT listener and other tools are available when running the R-code, the instructional modules presented in this article can still be used even if students use the R-code in a regression analysis course. Further discussion of regression analysis with dynamic graphics can be found in Cook and Weisberg (1989), and enhancements to the XLISP-STAT regression function are given in Cook and Weisberg (1991).
4 We begin by describing approaches for studying influence diagnostics through mouse actions in dynamically linked plots. We then show how to place an estimated regression surface through data points in a three-dimensional rotatable plot. We conclude with modules that examine properties of the sampling distribution of an estimated regression coefficient under various error distributions. The complete XLISP-STAT code for the modules in this article can be found in the Appendix. We encourage readers to run the modules as they read the article. To do this, simply start XLISP-STAT and paste the commands from the Appendix into the program at the command line. The modules presented in this article do not require familiarity with XLISP-STAT, although some knowledge will be needed to modify the modules. The modules are computationally intensive, and readers may experience some sluggishness depending on the speed of the computer running XLISP-STAT.
5 When a regression model is fit to data, it is of interest to assess the influence of individual observations on parameter estimates. Influence diagnostics such as Cook's distance, leverage, and DFFITS aid in this process. Student understanding of these quantities improves if mathematical definitions can be linked with visual interpretations in a graph. Instructors often resort to simple linear regression examples to illustrate these concepts with before-and-after case deletions. This approach does convey meaning, but for more complete understanding we would like to link such graphs with diagnostic measures for comparison, and be able to interact with the data in a convenient manner.
6 To address these goals, we have created functions that are
implemented through mouse actions for convenient use. These
functions are referred to as mouse modes. To activate one of these
new modes, click on the menu bar in a plot and highlight the Mouse
Mode menu item. A window will appear listing available mouse
modes. The list will include all the default choices plus any new
modes that have been created (see Figure 1). In the following
sections we present mouse modes and accompanying graphics for
influence diagnostics. We refer readers to the texts by
Weisberg (1985) and Cook and
Weisberg (1982) for background, formal
definitions, and use of influence diagnostics.
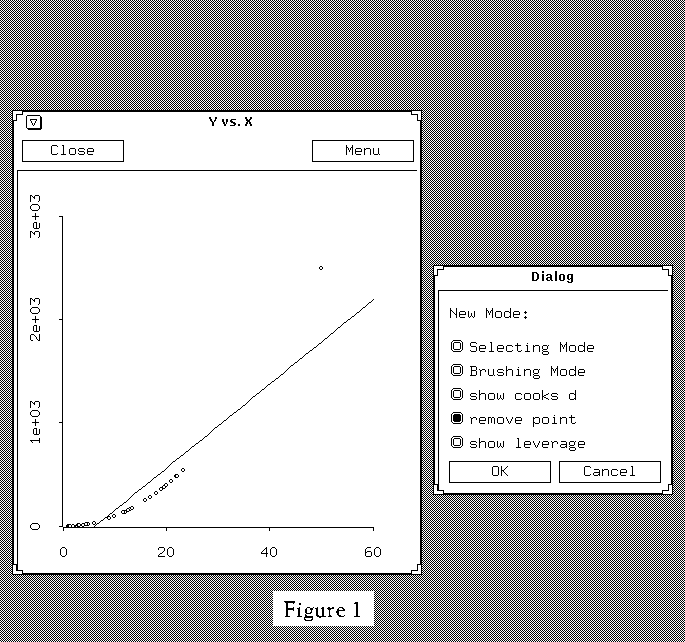 Figure 1 (7.9K gif)
Figure 1. Mouse Mode Menu. Any mouse mode defined will automatically be provided as an option in the mouse mode section of the menu. To switch mouse modes, click on the mouse mode menu item and move the cursor to the appropriate new mode.
7 Instead of trying to relate a separate listing of a diagnostic like Cook's distance to the point in question, it is convenient to directly display the value of the diagnostic by identifying a point in a visual display. One approach using standard XLISP-STAT features is given here for reference. We begin by defining x and y variables in a simple linear regression problem.
     (def x (list 1 1.2 1.5  2 2.9 3 3.9 4.9 6 9 10
     3.2 4.5 6 13 12 16 17 18 19 20 21  13.4 22 22.1
     23.4 11.8 19.6 12.6 30))
     (def y (+ 1 (^ x 2)(* .5 (normal-rand 30))))
8 This defines y as a function of x, namely y = 1 + x^{2} + \epsilon, where \epsilon is normally distributed with mean zero and standard deviation .5. Readers can use their own data in the modules by simply editing the x and y variable definitions given above to include the desired data. A regression model is then fit using the XLISP-STAT regression-model function.
     (def firstrm (regression-model x y))
     (def c (histogram (send firstrm :cooks-distances)))
     (def l (histogram (send firstrm :leverages)))
     (send c :title "Cook's Distances")
     (send l :title "Leverages")
     (setf w (plot-points x y))
9 The above code also defines histograms that display Cook's distances, leverages, and a scatterplot of y vs. x. The following command places the estimated regression line in the scatterplot.
      (send w :abline (select(send firstrm :coef-estimates) 0)
        (select (send firstrm :coef-estimates)1))
The options built into the graphics menu of the plots can link
all three plots simultaneously. A menu appears in the upper
right-hand corner of all graphics windows generated by XLISP-STAT.
By clicking on the menu bar, one can access the
linkview option.
The menu also allows a change to a built-in, alternative mouse mode
called brushing. The
brushing mode highlights the points that
the cursor touches; the linking extends the highlighting to all
three graphics windows. Thus, one can quickly sweep through all
the points to see their Cook's distances and leverages, and how a
particular point compares to others. Figure 2 shows the
scatterplot of the data with highlighting and linking.
 Figure 2 (9.3K gif)
Figure 2. Histograms and Scatterplot Demonstrating the Linked Highlighting Between the Graphics Windows. The brush can be moved to any points in the plot.
10 Another approach is to create a mouse mode that will display
a diagnostic when a point is selected in a graph. The mouse
mode defined below as show-cooks displays the Cook's distance of
any point in a scatterplot by clicking the mouse on the point.
Figure 3 shows the Cook's distance for the selected point
displayed nearby. The following code creates the scatterplot and
defines the show-cooks mouse mode.
      (def x (list 1 1.2 1.5  2 2.9 3 3.9 4.9 6 9 10 3.2 4.5 6 13 12

      16 17 18 19 20 21  13.4 22 22.1 23.4 11.8 19.6 12.6 50))

      (def y (+ 1 (^ x 2)(* .5 (normal-rand 30))))

      (setf w (plot-points x y))
      (def rm (regression-model x y))
      (send w :abline (select (send rm :coef-estimates) 0)
                      (select (send rm :coef-estimates) 1))
      (send w :add-mouse-mode 'show-cooks
              :title "show cooks d"
              :cursor 'finger
              :click :do-identify)
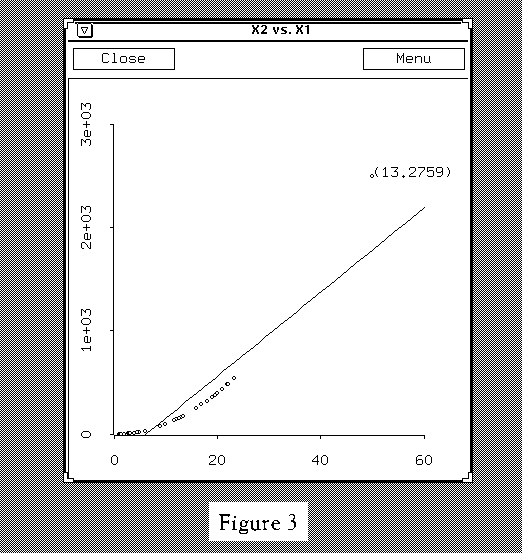 Figure 3 (6K gif)
Figure 3. Demonstration of the show-cooks Mouse Mode.
11 The code defines the show-cooks mouse mode and tells the
mouse mode to look for a method do-identify when the mouse
button is clicked.
      (defmeth w :do-identify(c1 c2 m1 m2)
          (let* ((cr (send self :click-range))
               (p (select (send rm :cooks-distances)
                          (first (send self :points-in-rect
                             (- c1 (round (/ (first cr) 2)))
                             (- c2 (round (/ (second cr) 2)))
                             (first cr)
                             (second cr))))))
         (if p
            (let ((mode (send self :draw-mode))
               (label (with-output-to-string (s) (prin1 (list p) s))))


            (send self :draw-mode 'xor)
            (send self :draw-string label c1 c2)
            (send self :while-button-down #'(lambda (c1 c2) nil))
            (send self :draw-string label c1 c2)
            (send self :draw-mode mode)))))
12 The lines above define the do-identify method. This
sequence of actions looks in a small rectangle surrounding the
cursor to find the nearest point's index, and uses it to select
the Cook's distance defined as p. The draw-mode is changed to
xor, and the Cook's distance,
p, is displayed as a string
called label. (This draw-mode changes the color of whatever is
drawn or printed to the opposite of the background color.) The
while-button-down function is an idling mechanism that stops any
action while the mouse button is pressed. When the button is
released, the color of the string returns to the background color,
thus making the display disappear. The mouse mode given above can
easily be modified to any other influence diagnostic by
sending the regression model object (called rm above) a message
to display another diagnostic. We refer readers to the
documentation for other regression model messages.
13 Another important concept in regression analysis is to
understand the effect of removing a data point from the analysis.
We implement this action in a new mouse mode called
vanish.
When this mouse mode is invoked, the user can move to any point on
a scatterplot and make it disappear by pressing the mouse button.
While the button is held down, the regression line is erased and a
new one is drawn using only the visible points. When the button
is released, the point and the original regression line return.
Figure 4 shows this process by presenting a scatterplot with
regression line before the mouse button is clicked and while it is
being held down.
 Figure 4 (9.4K gif)
Figure 4. Demonstration of the vanish Mouse Mode. The
left window shows the original scatterplot and estimated
regression line. The window on the right shows the
scatterplot and estimated regression line with a point
removed by the vanish mouse mode. When the button is
released, the point and the original regression line return.
14 The XLISP-STAT code for this mouse mode consists of the following commands. We begin by defining the data and regression model as before.
      (def x (list 1 1.2 1.5  2 2.9 3 3.9 4.9 6 9 10 3.2 4.5 6 13 12
          16 17 18 19 20 21  13.4 22 22.1 23.4 11.8 19.6 12.6 50))

      (def y (+ 1 (^ x 2)(* .5 (normal-rand 30))))

      (setf w (plot-points x y))
      (def rm (regression-model x y))
      (send w :abline (select (send rm :coef-estimates) 0)
                      (select (send rm :coef-estimates) 1))
15 The commands for defining the new mouse mode are given below.
       (send w :add-mouse-mode 'vanish
              :title "remove point"
              :cursor 'finger
              :click :do-vanish)
This defines a new mouse mode called vanish and tells it
to look for a method do-vanish when the mouse button is pressed.
      (defmeth w :do-vanish (c1 c2 m1 m2)
          (let* ((cr (send self :click-range))
              (p (first (send self :points-in-rect
                 (- c1 (round (/ (first cr) 2)))
                 (- c2 (round (/ (second cr) 2)))
                 (first cr)
                 (second cr)))))
      (if p
      (let (( nrm (regression-model
                 (select x (remove p (iseq 30)))
                 (select y (remove p (iseq 30))))))
      (send self :clear )
      (send self :add-points (select x (remove p (iseq 30)))
                 (select y (remove p (iseq 30))))

      (send self :abline (select (send nrm :coef-estimates) 0)
                 (select (send nrm :coef-estimates) 1))
      (send self :while-button-down #'(lambda (x y) nil))
      (send self :clear)
      (send self :add-points x y)
      (send self :abline (select (send rm :coef-estimates) 0)
                 (select (send rm :coef-estimates) 1))) )))
16 The above sequence begins like the
show-cooks mode by
finding the index of the point near the cursor. This method uses
the index to remove the point from the data set. Then a new
regression model called nrm is computed. The scatterplot window
is cleared, the points are plotted without the selected point, and
the new regression line is drawn. The
while-button-down
function idles all action, and when the button is released, the
complete set of points is plotted, and the regression line is
refitted.
17 The ability to move a point in a scatterplot to a new
location to observe the change in the estimated model is also
informative. The mouse mode called point-moving as defined in
Tierney (1990, p. 277) changes the cursor to a pointing finger and
allows the user to click on any point in a scatterplot and, while
the button is down, drag it to new position on the plot. When the
mouse button is released, the regression line and the two
histograms are redrawn to show the new distributions of Cook's
distances and leverages. Figures 5 and 6 demonstrate this action
by showing the three graphics windows before and after a point
has been moved, respectively.
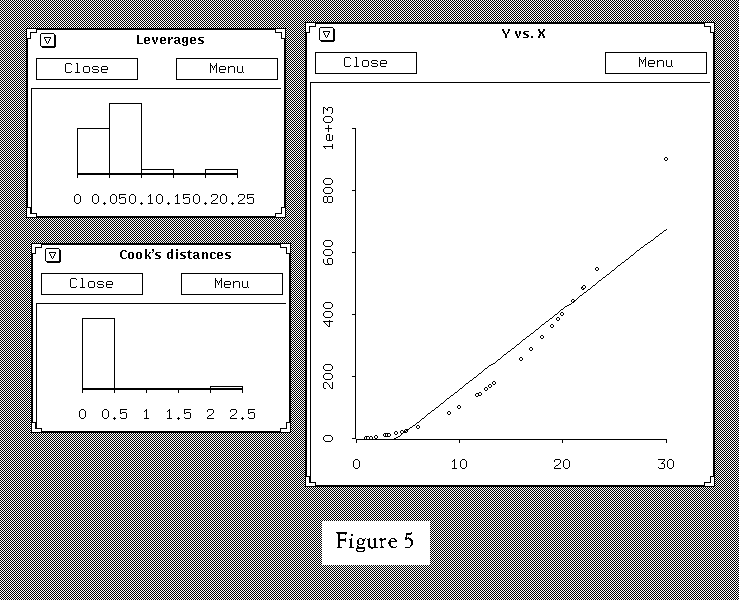 Figure 5 (9.3K gif)
Figure 5. Scatterplot with Regression Line and Two Histograms. Using the mouse, any point on the scatterplot can be moved and all graphs will adjust.
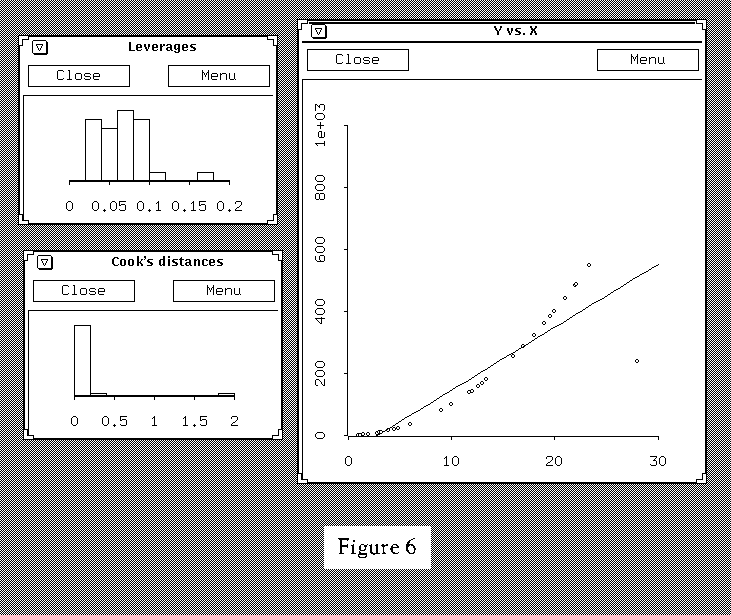 Figure 6 (9.3K gif)
Figure 6. Result of Moving a Point. The three graphs from Figure 5 are redrawn after the point farthest to the right has been moved to the bottom of the plot.
18 The regression model, histograms, and scatterplots are as defined earlier in the previous mouse modes. Only the code for this mouse mode is given below, but the code for the entire module is given in the Appendix.
     (send w :add-mouse-mode 'point-moving
              :title "move points"
              :cursor 'finger
              :click :move-them)
This provides the scatterplot another mouse mode and tells it
to look for a method move-them when the mouse button is clicked.
     (defmeth w :move-them (x y a b)
           (let ((p (send self :drag-point x y :draw nil)))
           (if p (send self :set-regression-line))))
This defines the method move-them that sends the plot
(self) the message
set-regression-line that is activated when
the mouse button is released.
     (defmeth w :set-regression-line ()
           (let ((coefs (send self :redraw-windows)))
           (send self :clear-lines :draw nil)
           (send self :abline (select coefs 0)
           (select coefs 1))))
This defines the method
set-regression-line, which begins by
sending the plot a message to activate the
redraw-windows
method. The remainder of the
set-regression-line method clears
an old regression line from the plot and places a new regression
line in the plot using the information from the
redraw-windows
method.
     (defmeth w :redraw-windows()
           (let* ((i (iseq 0 (- (send self     :num-points) 1)))
           (x (send self :point-coordinate 0 i))
           (y (send self :point-coordinate 1 i))
           (rm (regression-model x y :print nil)))
      (send l :clear :draw nil)
      (send l :add-points (send rm :leverages))
      (send l :adjust-to-data)
      (send l :title "Leverage")
      (send c :clear :draw nil)
      (send c :add-points (send rm :cooks-distances))
      (send c :adjust-to-data)
      (send c :title "Cook's Distance")
      (send c :location 55 300)
      (send rm :coef-estimates)))
19 The lines above are part of the
redraw-windows method.
This sequence finds the coordinates of the moved point, clears the
histograms and scatterplot, and redraws them in their new form.
      (send w :title "Y vs. X")
      (send w :set-regression-line)
      (send w :location 390 130)
      (send w :mouse-mode 'point-moving)
This initializes the point-moving mouse mode. The ability
to move points and see the resulting changes in the graph and the
diagnostic statistics is an excellent educational tool.
20 Instructors usually have little trouble explaining the simple linear regression model because graphs and plots can be presented in two dimensions. Explaining a multiple regression model becomes much more difficult because of higher dimensions. In the following module we present XLISP-STAT code for placing a regression surface in a three-dimensional scatterplot. This plot is rotatable in all dimensions, and gives students insight into higher dimensions. Figures 7a-d display some examples.
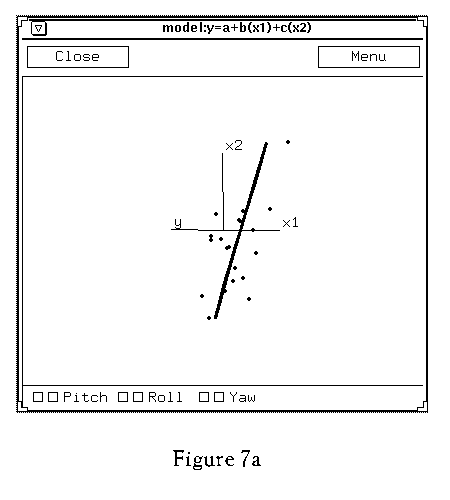
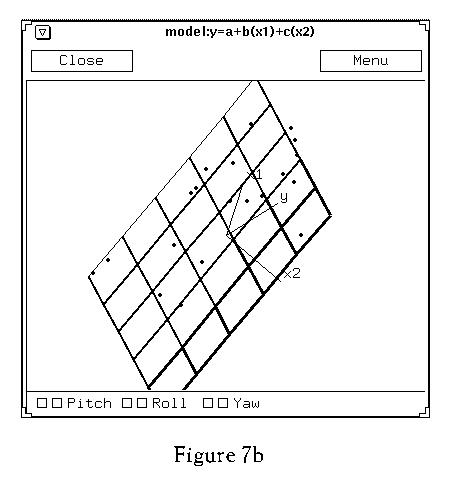 Figure 7b (5.8K gif)
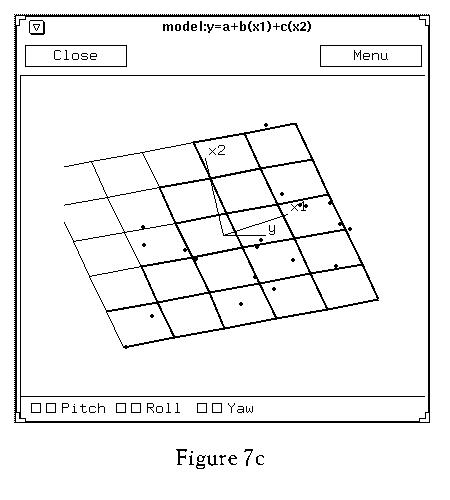
 Figure 7d (3.9K gif)
Figures 7a-d. Three-Dimensional Plots. Spin-plots in XLISP-STAT allow for a wide range of perspectives.
21 This example plots y vs. x_1 and x_2. It also fits a regression plane through the data. Here is the code for this example:
      (def x1 (list 19.5 24.7 30.7 29.8 19.1 25.6 31.4 27.9
      22.1 25.5 31.1 30.4 18.7 19.7 14.6 29.5 27.7 30.2 22.7 25.2))
      (def y (list 11.9 22.8 18.7 20.1 12.9 21.7 27.1 25.4
      21.3 19.3 25.4 27.2 11.7 17.8 12.8 23.9 22.6 25.4 14.8 21.1))
      (def x2 (list 29.1 28.2 37 31.1 30.9 23.7 27.6 30.6 23.2 24.8
      30 28.3 23 28.6 21.3 30.1 25.7 24.6 27.1 27.5))

      (def rm (regression-model (list x1 x2) y))
      (def sp (spin-plot (list x1 x2 y )
               :title "model:y=a+b(x1)+c(x2)"
               :variable-labels (list "x1" "x2" "y")))
      (send sp :abcplane
         (select (send rm :coef-estimates) 0)
         (select (send rm :coef-estimates) 1)
         (select (send rm :coef-estimates) 2))
      (send sp :back-color 'white)
      (send sp :draw-color 'black)
22 All of the tools for two-dimensional plots are available for
these spin-plots, including linking, highlighting, and
development of new mouse modes. Figure 8 displays the
show-cooks mouse mode from the previous section used with a
spin-plot.
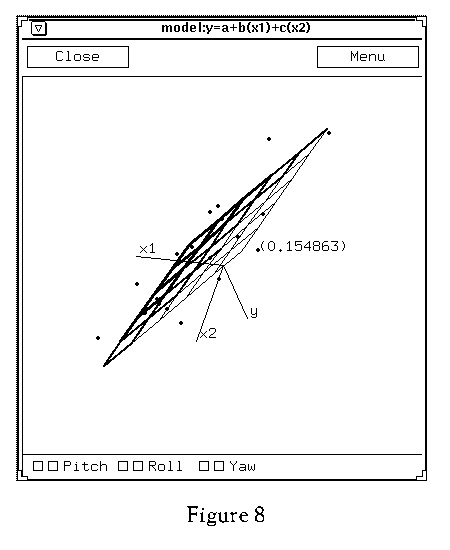 Figure 8 (5K gif)
Figure 8. Demonstration of show-cooks Mouse Mode in Three
Dimensions. New mouse modes can be used in
three-dimensional spin-plots. Here the *show-cooks* mouse
mode is used to display the Cook's distance of the chosen
point.
23 The sampling distribution of an estimated regression coefficient is known to be normal when the errors are normal with mean zero and variance \sigma^{2} in the linear model Y = X \beta + \epsilon. However, it is of interest to show students what happens to the sampling distribution when we change things like the error variance, the sample size, or the matrix X. It is also of interest to show students how the sampling distribution changes when we violate the normality assumption for the errors.
24 To examine these questions we have created some dynamic simulation modules that illustrate how the sampling distribution of an estimated regression coefficient changes when we alter the underlying model conditions. The first module examines how the sampling distribution changes when we change the error variance. We begin by specifying the linear model y = x + \epsilon, where \epsilon is normal with mean zero and variance \sigma^{2}.
      (defun newy (x sig)
         (+ x (* sig (normal-rand (length x)))))
      (def x (list 1 1.6 2.5 3 4 4.6 5 5.7 6 7))
      (def beta (list ))
      ;............................................................
      ; The following set of estimates sets up the first histogram.
      ; to have a reasonable range of values.                         .
      ;............................................................
      (dotimes (i 50)
         (def output (regression-model x (newy x 2) :print nil))


         (def beta (append beta (list (select
         (send output :coef-estimates) 1))))  )
      (def hist (histogram beta))
25 The commands given above define a collection of 50 slope estimates contained in the list beta and presented in the histogram hist.
       (defun change-sig (sig)
         (def beta (list ))
         (dotimes (i 50)
         (def output (regression-model x (newy x sig) :print nil))


         (def beta (append beta (list (select
         (send output :coef-estimates) 1))))   )
         (send hist :clear :draw nil)
         (send hist :add-points beta)   )
      (sequence-slider-dialog (rseq .2 2.5 15)
         :action #'change-sig)
26 The commands above define a slider that controls the
parameter \sigma in the linear model through the function
newy.
When the slider is changed, a new collection of 50 parameter
estimates are soon displayed under the new \sigma conditions. How
soon these new estimates appear on the screen depends greatly on
the speed of the computer running XLISP-STAT. The slider is
defined to let \sigma take 15 values between .2 to 2.5. Users may
modify the number of replications displayed by changing the number
in the dotimes statement. Figure 9 shows the windows for this
module.
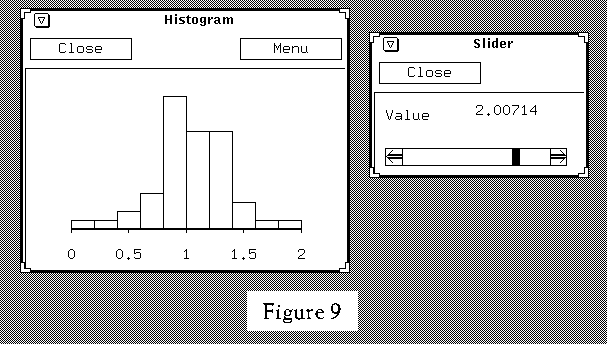 Figure 9 (4.9K gif)
Figure 9. Histogram of the Sampling Distribution of an Estimated Regression Coefficient and Slider for Dynamically Changing the Error Variance.
27 The next module lets us examine the impact of the normality assumption on the sampling distribution of an estimated regression coefficient. We begin by defining the regression model as given in the previous module except that now the errors are gamma-distributed.
       (defun newy (x sig)
         (+ x (* sig (gamma-rand (length x) 1))))
      (defun newx (n)
         (normal-rand n))
      (def beta (list ))
      (def r (normal-quant (/ (iseq 1 40) 41)))
      (dotimes (i 40)
         (def x (newx 10))
         (def output (regression-model x (newy x 2) :print nil))


         (def beta (append beta (list (select
         (send output :coef-estimates) 1))))    )
      (def myplot (plot-points r  beta))
28 The code given above defines a normal probability plot to examine the normality of the sampling distribution as a function of the sample size. The module currently uses 40 parameter estimate replications in the probability plot.
    (defun change-n (n)
         (def beta (list ))
         (dotimes (i 40)
         (def x (newx n))
         (def output (regression-model x (newy x 2) :print nil))


         (def beta (append beta (list (select
         (send output :coef-estimates) 1))))   )
         (def betat (sort-data beta))
         (send myplot :clear :draw nil)
         (send myplot :add-points r betat)  )
      (sequence-slider-dialog (list 5 10 25 50 80     100)
         :action #'change-n)
29 The above commands create a slider that controls the sample
size and quickly re-draws the normal probability plot when the
sample size is changed. The slider used here uses possible sample
sizes from the list (5, 10, 25, 50, 80, 100). Users may change
from gamma-distributed errors to any other distribution by
changing the random number generation in the function
newy. The
windows for this module are shown in Figure 10.
 Figure 10 (6.2K gif)
Figure 10. Normal Probability Plot and Slider for Dynamically Changing the Sample Size.
30 Our goal in this article is not to provide readers with a complete set of educational modules, but rather to illustrate the many features of XLISP-STAT relevant for instruction, and to provide a basis for continued advancements for regression and other statistics courses. The programming structures and methods used in these modules can be modified and expanded with only a moderate amount of XLISP-STAT programming experience. We hope that other educators will be inspired by the potential of these approaches and will continue the development of instructional material for statistics courses.
1. Module for linking scatterplot and two histograms.
     (def x (list 1 1.2 1.5  2 2.9 3 3.9 4.9 6 9 10
    3.2 4.5 6 13 12 16 17 18 19 20 21  13.4 22 22.1
    23.4 11.8 19.6 12.6 30))
    (def y (+ 1 (^ x 2)(* .5 (normal-rand 30))))
    (def firstrm (regression-model x y))
    (def c (histogram (send firstrm     :cooks-distances)))
    (def l (histogram (send firstrm :leverages)))
    (send c :title "Cook's Distances")
    (send l :title "Leverages")
    (setf w (plot-points x y))
    (send w :abline (select(send firstrm     :coef-estimates) 0)
       (select (send firstrm :coef-estimates)1))
2. Module for show-cooks mouse mode.
     (def x (list 1 1.2 1.5  2 2.9 3 3.9 4.9 6 9 10 3.2 4.5 6 13 12
    16 17 18 19 20 21  13.4 22 22.1 23.4 11.8 19.6 12.6 50))

    (def y (+ 1 (^ x 2)(* .5 (normal-rand 30))))

    (setf w (plot-points x y))
    (def rm (regression-model x y))
    (send w :abline (select (send rm :coef-estimates) 0)
                    (select (send rm :coef-estimates) 1))
    (send w :add-mouse-mode 'show-cooks
            :title "show cooks d"
            :cursor 'finger
            :click :do-identify)
    (defmeth w :do-identify(c1 c2 m1 m2)
    (let* ((cr (send self :click-range))
            (p (select (send rm :cooks-distances)
                    (first (send self :points-in-rect
                       (- c1 (round (/ (first cr) 2)))
                       (- c2 (round (/ (second cr) 2)))
                       (first cr)
                       (second cr))))))
       (if p
          (let ((mode (send self :draw-mode))
          (label (with-output-to-string (s) (prin1 (list p) s))))


          (send self :draw-mode 'xor)
          (send self :draw-string label c1 c2)
          (send self :while-button-down #'(lambda (c1 c2) nil))
          (send self :draw-string label c1 c2)
          (send self :draw-mode mode)))))
3. Module for vanish mouse mode.
     (def x (list 1 1.2 1.5  2 2.9 3 3.9 4.9 6 9 10 3.2 4.5 6 13 12

    16 17 18 19 20 21  13.4 22 22.1 23.4 11.8 19.6 12.6 50))


    (def y (+ 1 (^ x 2)(* .5 (normal-rand 30))))

    (setf w (plot-points x y))
    (def rm (regression-model x y))
    (send w :abline (select (send rm :coef-estimates) 0)
                    (select (send rm :coef-estimates) 1))
    (send w :add-mouse-mode 'vanish
            :title "remove point"
            :cursor 'finger
            :click :do-vanish)
    (defmeth w :do-vanish (c1 c2 m1 m2)
    (let* ((cr (send self :click-range))
            (p (first (send self :points-in-rect
               (- c1 (round (/ (first cr) 2)))
               (- c2 (round (/ (second cr) 2)))
               (first cr)
               (second cr)))))
    (if p
    (let (( nrm (regression-model
               (select x (remove p (iseq 30)))
               (select y (remove p (iseq 30))))))
    (send self :clear )
    (send self :add-points (select x (remove p (iseq 30)))
               (select y (remove p (iseq 30))))

    (send   self   :abline
                   (select (send nrm :coef-estimates) 0)
                   (select (send nrm :coef-estimates) 1))
    (send self :while-button-down #'(lambda (x y) nil))
    (send self :clear)
    (send self :add-points x y)
    (send self :abline (select (send rm :coef-estimates) 0)
               (select (send rm :coef-estimates) 1))) )))
4. Module for point-moving mouse mode.
      (def x (list 1 1.2 1.5  2 2.9 3 3.9 4.9 6 9 10 3.2 4.5 6 13 12
    16 17 18 19 20 21  13.4 22 22.1 23.4 11.8 19.6 12.6 50))

    (def y (+ 1 (^ x 2)(* .5 (normal-rand 30))))

    (setf w (plot-points x y))
    (def rm (regression-model x y))
    (def c (histogram (send rm :cooks-distances)))
    (def l (histogram (send rm :leverages)))
    (send c :title "Cook's Distances")
    (send l :title "Leverages")
    (send w :abline (select (send rm :coef-estimates) 0)
                    (select (send rm :coef-estimates) 1))
    (send w :add-mouse-mode 'point-moving
            :title "move points"
            :cursor 'finger
            :click :move-them)
    (defmeth w :move-them (x y a b)
       (let ((p (send self :drag-point x y :draw nil)))
       (if p (send self :set-regression-line))))
    (defmeth w :set-regression-line ()
       (let ((coefs (send self :redraw-windows)))
       (send self :clear-lines :draw nil)
       (send self :abline (select coefs 0)
       (select coefs 1))))
    (defmeth w :redraw-windows()
       (let* ((i (iseq 0 (- (send self :num-points) 1)))
       (x (send self :point-coordinate 0 i))
       (y (send self :point-coordinate 1 i))
       (rm (regression-model x y :print nil)))
    (send l :clear :draw nil)
    (send l :add-points (send rm :leverages))
    (send l :adjust-to-data)
    (send l :title "Leverage")
    (send c :clear :draw nil)
    (send c :add-points (send rm :cooks-distances))
    (send c :adjust-to-data)
    (send c :title "Cook's Distance")
    (send c :location 55 300)
    (send rm :coef-estimates)))
    (send w :title "Y vs. X")
    (send w :set-regression-line)
    (send w :location 390 130)
    (send w :mouse-mode 'point-moving)
5. Module for visualizing a multiple regression function.
      (def x1 (list 19.5 24.7 30.7 29.8 19.1 25.6 31.4 27.9
    22.1 25.5 31.1 30.4 18.7 19.7 14.6 29.5 27.7 30.2 22.7 25.2))
    (def y (list 11.9 22.8 18.7 20.1 12.9 21.7 27.1 25.4
    21.3 19.3 25.4 27.2 11.7 17.8 12.8 23.9 22.6 25.4 14.8 21.1))
    (def x2 (list 29.1 28.2 37 31.1 30.9 23.7 27.6 30.6 23.2 24.8
    30 28.3 23 28.6 21.3 30.1 25.7 24.6 27.1 27.5))

    (def rm (regression-model (list x1 x2) y))
    (def sp (spin-plot (list x1 x2 y )
             :title "model:y=a+b(x1)+c(x2)"
             :variable-labels (list "x1" "x2" "y")))
    (send sp :abcplane
       (select (send rm :coef-estimates) 0)
       (select (send rm :coef-estimates) 1)
       (select (send rm :coef-estimates) 2))
    (send sp :back-color 'white)
    (send sp :draw-color 'black)
6. Module for changing \sigma with a slider to observe the change in the sampling distribution of an estimated regression parameter.
     (defun newy (x sig)
       (+ x (* sig (normal-rand (length x)))))
    (def x (list 1 1.6 2.5 3 4 4.6 5 5.7 6 7))
    (def beta (list ))
    ;............................................................
    ; The following set of estimates sets up the first histogram.
    ; to have a reasonable range of values.                     .
    ;............................................................
    (dotimes (i 50)
       (def output (regression-model x (newy x 2) :print nil))
       (def beta (append beta (list (select
       (send output :coef-estimates) 1))))  )
    (def hist (histogram beta))
    (defun change-sig (sig)
       (def beta (list ))
       (dotimes (i 50)
       (def output (regression-model x (newy x sig) :print nil))
       (def beta (append beta (list (select
       (send output :coef-estimates) 1))))   )
       (send hist :clear :draw nil)
       (send hist :add-points beta)   )
    (sequence-slider-dialog (rseq .2 2.5 15)
       :action #'change-sig)
7. Module for changing the sample size n with a slider to observe the change in the sampling distribution of an estimated regression parameter for non-normal errors.
     (defun newy (x sig)
       (+ x (* sig (gamma-rand (length x) 1))))
    (defun newx (n)
       (normal-rand n))
    (def beta (list ))
    (def r (normal-quant (/ (iseq 1 40) 41)))
    (dotimes (i 40)
       (def x (newx 10))
       (def output (regression-model x (newy x 2) :print nil))
       (def beta (append beta (list (select
       (send output :coef-estimates) 1))))    )
    (def myplot (plot-points r  beta))
    (defun change-n (n)
       (def beta (list ))
       (dotimes (i 40)
       (def x (newx n))
       (def output (regression-model x (newy x 2) :print nil))
       (def beta (append beta (list (select
       (send output :coef-estimates) 1))))   )
       (def betat (sort-data beta))
       (send myplot :clear :draw nil)
       (send myplot :add-points r betat)  )
    (sequence-slider-dialog (list 5 10 25 50 80 100)
       :action #'change-n)
Cook, R. D., and Weisberg, S. (1982), Residuals and Influence in Regression , London: Chapman and Hall.
Cook, R. D., and Weisberg, S. (1989), "Regression Diagnostics With Dynamic Graphics," Technometrics, 31, 277-311.
Cook, R. D., and Weisberg, S. (1991), "Dynamic Graphics and Regression Diagnostics Using XLISP-STAT," Technical Report 565, University of Minnesota, School of Statistics.
Cook, R. D., and Weisberg, S. (1994), Introduction to Regression Graphics , New York: John Wiley.
Tierney, L. (1990), LISP-STAT , New York: John Wiley.
Weisberg, S. (1985), Applied Linear Regression (2nd
ed.), New York: John Wiley.